Human Resources Management Spreadsheet Template
Welcome to our Human Resources Management Excel spreadsheet! This spreadsheet is designed to help you manage your human resources in an efficient and organized manner. With this spreadsheet, you can easily track employee information, manage payroll, and generate reports.
We hope this Human Resources Management Excel spreadsheet helps you manage your human resources in an efficient and organized manner. Thanks for using our spreadsheet!
You can watch the YouTube video below if you don't want to read the whole page. Let's start.
Home Page
The Home sheet is the landing page of the Excel file and provides an overview of the other sheets.
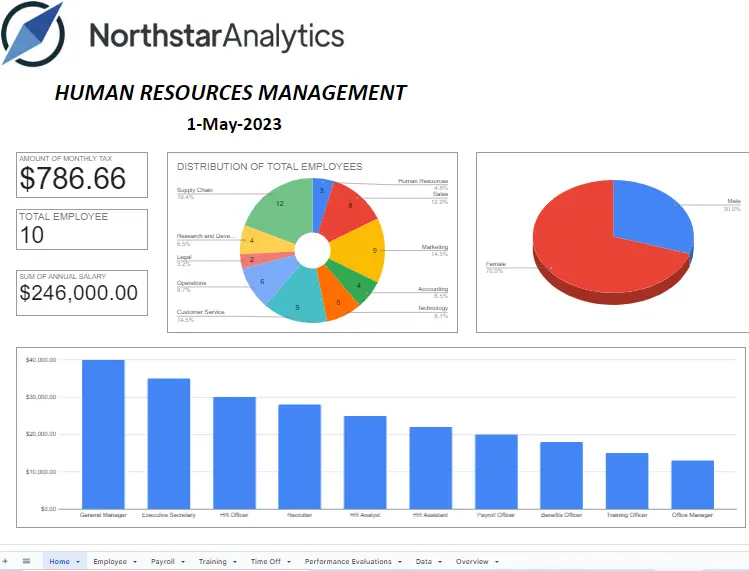
- To get today's date on this page, simply type =TODAY() in the formula bar on the left top side of the page. You can customize the appearance of the cell by merging cells and using formatting tools. To view the formula and formatting options, click on the cell.
- The "AMOUNT OF MONTHLY TAX" scorecard chart shows the sum of data from the "TAXES WITHHELD (Auto-fill)" column in the table located on the Payroll page. This column consists of rows calculated using a formula. The formula used is =E3-(E3/1.18), which utilizes the E column named GROSS PAYE.
- In the formula, "=E3-(E3/1.18)", we are subtracting the result of dividing the value in cell E3 by 1.18 from the original value in cell E3. This calculation is performed to determine the taxes paid calculated a tax rate of 18% from the gross pay represented in the E column.
3. The "TOTAL EMPLOYEE" scorecard chart shows the aggregate count of data from the "FULL NAME" column in the table located on the Employee page.
4. The "SUM OF ANNUAL SALARY" scorecard chart shows the sum of data from the "ANNUAL SALARY" column in the table located on the Employee page.
5. The "donut chart" displays the distribution of total employees by department.
- In a donut chart, the different departments are represented by segments of the chart, where each segment's size corresponds to the number of employees in that department. The center of the chart is empty, creating a "donut" shape. The chart provides a visual representation of the proportionate distribution of employees across departments.
6. The 3D pie chart represents the distribution of employees by gender.
7. The "Stacked column chart" represents the annual salary distribution of employees based on their titles.
- The chart uses a stacked column format, where each column represents a specific title of the employees. The vertical axis represents the salary amount, while the horizontal axis represents the time period (yearly).
Employee Page
The Employee sheet in the organization holds a comprehensive list of currently employed individuals, including their personal details, job titles, start dates, and salaries.
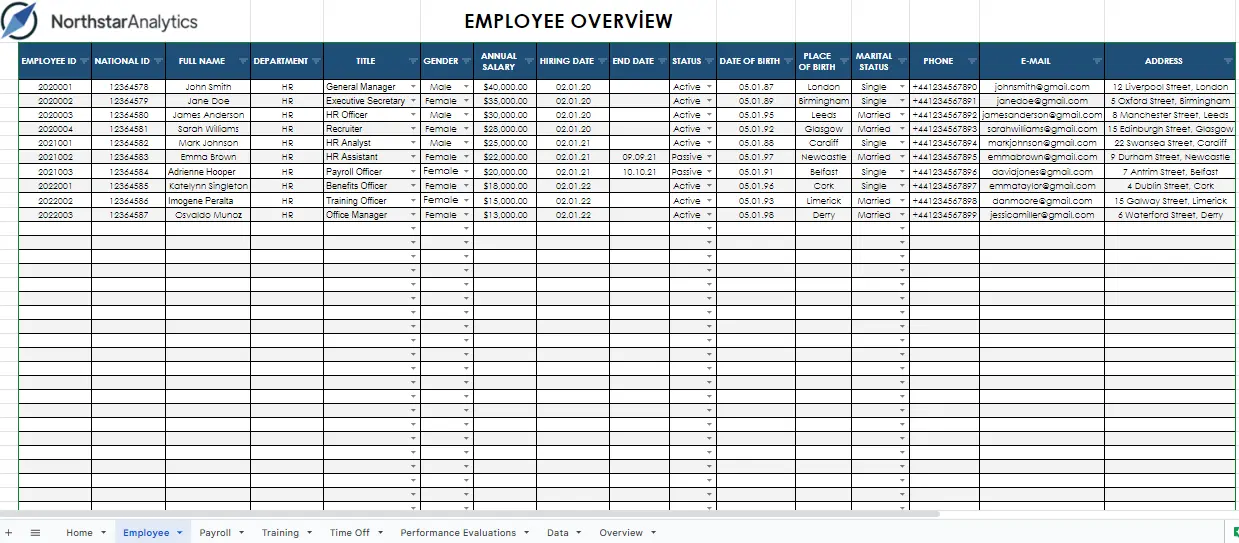
- EMPLOYEE ID: The EMPLOYEE ID column contains unique identification numbers assigned to each employee. It serves as a primary identifier for tracking and referencing individual employees within the organization.
- NATIONAL ID: The NATIONAL ID column stores the national identification numbers of employees. It is used for legal and administrative purposes, providing a unique identifier specific to each employee's nationality.
- FULL NAME: The FULL NAME column represents the complete name of each employee, including their first name and last name. It helps identify employees and distinguish them from one another.
- DEPARTMENT: The DEPARTMENT column indicates the specific department or division to which each employee belongs. It helps organize and categorize employees based on their assigned roles or areas of responsibility within the organization.
- TITLE: The TITLE column denotes the job title or position held by each employee. It provides information about the employee's role, responsibilities, and level within the organizational hierarchy.
- GENDER: The GENDER column captures the gender identity of each employee, indicating whether they identify as male or female. It is used for demographic and statistical purposes and to ensure equal opportunity and fairness in the workplace.
- ANNUAL SALARY: The ANNUAL SALARY column displays the yearly salary for each employee. It represents the agreed-upon salary package for their employment and serves as a basis for calculating payroll and benefits.
- HIRING DATE: The HIRING DATE column records the date when each employee was hired or started working for the company. It helps track the duration of their employment and serves as a reference point for various HR processes.
- END DATE: The END DATE column specifies the date when an employee's employment contract or association with the company officially ends or is terminated. It is used for tracking and managing employee separations or transitions.
- STATUS: The STATUS column indicates the current employment status of each employee, whether they are active, passive, suspended, or any other relevant status. It helps HR personnel keep track of employee availability and manage workforce planning.
- DATE OF BIRTH: The DATE OF BIRTH column captures the birth dates of employees. It is used for age verification, eligibility for certain benefits or programs, and compliance with legal requirements.
- PLACE OF BIRTH: The PLACE OF BIRTH column records the birthplace or hometown of each employee. It provides information about their geographic origins and can be useful for demographic analysis or determining citizenship status.
- MARITAL STATUS: The MARITAL STATUS column indicates the current marital status of each employee, such as single, married, divorced, or widowed. It helps HR manage employee benefits, tax withholding, and other related matters.
- PHONE: The PHONE column stores the contact phone numbers of employees. It allows for easy communication and ensures that HR or other relevant personnel can reach out to employees when necessary.
- E-MAIL: The E-MAIL column contains the email addresses of employees. It serves as a primary mode of electronic communication for official correspondence, updates, and notifications within the organization.
- ADDRESS: The ADDRESS column captures the residential or mailing addresses of employees. It helps maintain accurate contact information and enables HR to send important documents or correspondence to the correct addresses.
Payroll Page
The Payroll sheet encompasses all the necessary data for calculating employee wages and salaries, including payment methods, pay rates, deductions, taxes, and other pertinent payroll details, and allows for easy editing of existing employee information by double-clicking on the respective cell.
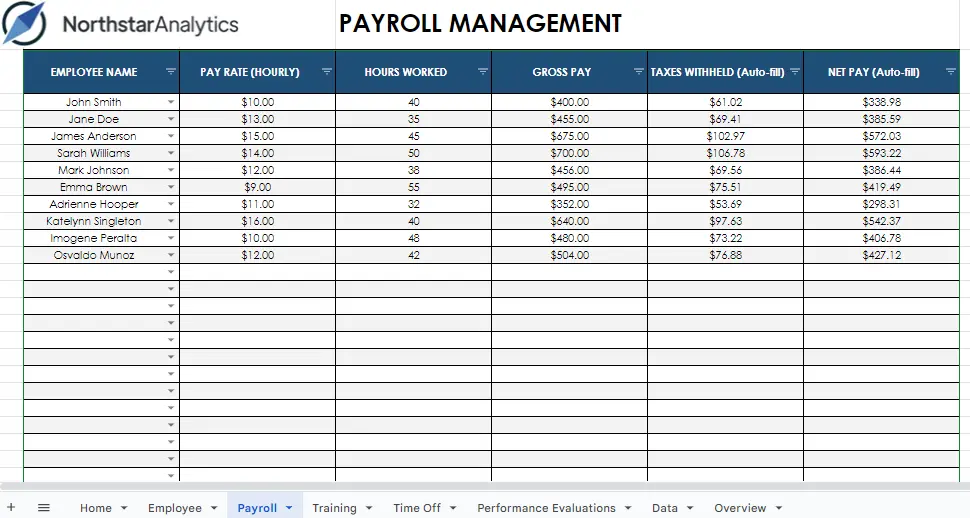
- EMPLOYEE NAME: This column records the names of employees working within your organization. It helps identify and differentiate individuals within the context of payroll management.
- PAY RATE (HOURLY): The PAY RATE (HOURLY) column represents the hourly wage for each employee. It specifies the amount they earn for each hour worked.
- HOURS WORKED: This column records the number of hours worked by each employee within a given period. It helps calculate the total working hours for payroll calculations.
- GROSS PAY: The GROSS PAY column displays the total payment amount earned by each employee before any deductions or taxes are applied. It represents the total wages earned based on the hourly pay rate and hours worked.
- TAXES WITHHELD (Auto-fill): This column automatically calculates and fills in the amount of taxes withheld from an employee's gross pay. It includes deductions for income taxes or any other applicable taxes required by tax regulations.
- NET PAY (Auto-fill): The NET PAY column is automatically populated and represents the final amount an employee receives after all deductions, including taxes, have been applied. It reflects the employee's take-home pay.
Training Page
The Training sheet is used to track employee training and education, including a list of training courses, their conducted dates, and the employees who completed them. You can updates course information by double-clicking on the cells.
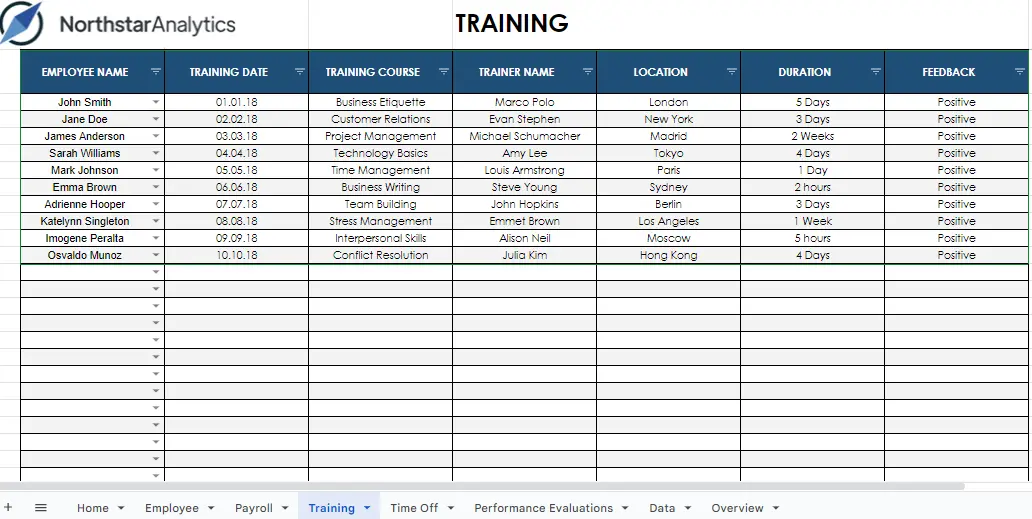
- EMPLOYEE NAME: The EMPLOYEE NAME column contains the names of the employees who have undergone training. It helps identify and associate each training record with a specific employee.
- TRAINING DATE: This column records the dates on which the training sessions took place. It allows for easy tracking and reference of when each training event occurred.
- TRAINING COURSE: The TRAINING COURSE column provides information about the specific courses or programs that were completed during the training. It helps identify the subject or topic of each training session.
- TRAINER NAME: This column captures the names of the trainers or instructors who conducted the training sessions. It allows for easy identification of the individuals responsible for delivering the training.
- LOCATION: The LOCATION column records the venues or locations where the training sessions were held. It helps track the physical location where each training event took place.
- DURATION: The DURATION column indicates the length or duration of each training session. It provides information on the amount of time employees spent participating in the training program.
- FEEDBACK: This column allows participants to provide feedback or comments about the training sessions they attended. It offers an opportunity for employees to share their opinions, suggestions, or any other relevant information regarding the training experience.
Time Off Page
The Time Off sheet is designed to track employee leave requests and absences, containing a comprehensive list of leave requests, their corresponding dates, and the employees who initiated the requests.
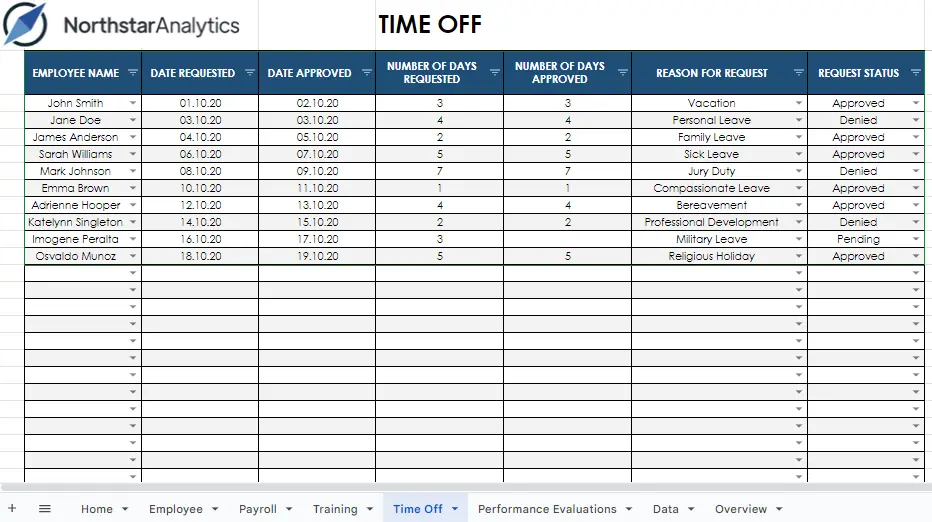
- EMPLOYEE NAME: This column contains the names of employees who have requested time off. It helps identify and track individual employees' time-off requests within the organization.
- DATE REQUESTED: The DATE REQUESTED column indicates the date on which the employee submitted their time-off request. It provides a record of when the request was initially made.
- DATE APPROVED: This column shows the date on which the time-off request was approved by the relevant authority. It serves as a reference for when the request was officially authorized.
- NUMBER OF DAYS REQUESTED: In this column, the number of days requested for time off by each employee is recorded. It reflects the duration for which an employee wishes to be absent from work.
- NUMBER OF DAYS APPROVED: The NUMBER OF DAYS APPROVED column displays the number of days that have been approved for the employee's time off. It represents the authorized duration of the employee's absence.
- REASON FOR REQUEST: This column provides a brief explanation or description of the reason why the employee is requesting time off. It helps provide context or justification for the requested absence.
- REQUEST-STATUS: The REQUEST-STATUS column indicates the current status of the time-off request, whether it is "Approved," "Pending", or "Denied." It allows for easy tracking and monitoring of the request's progress.
Performance Evaluations Page
The Performance Evaluations sheet serves as a comprehensive tracker of employee performance reviews, including the reviewed employees' list, review dates, and reviewer comments.
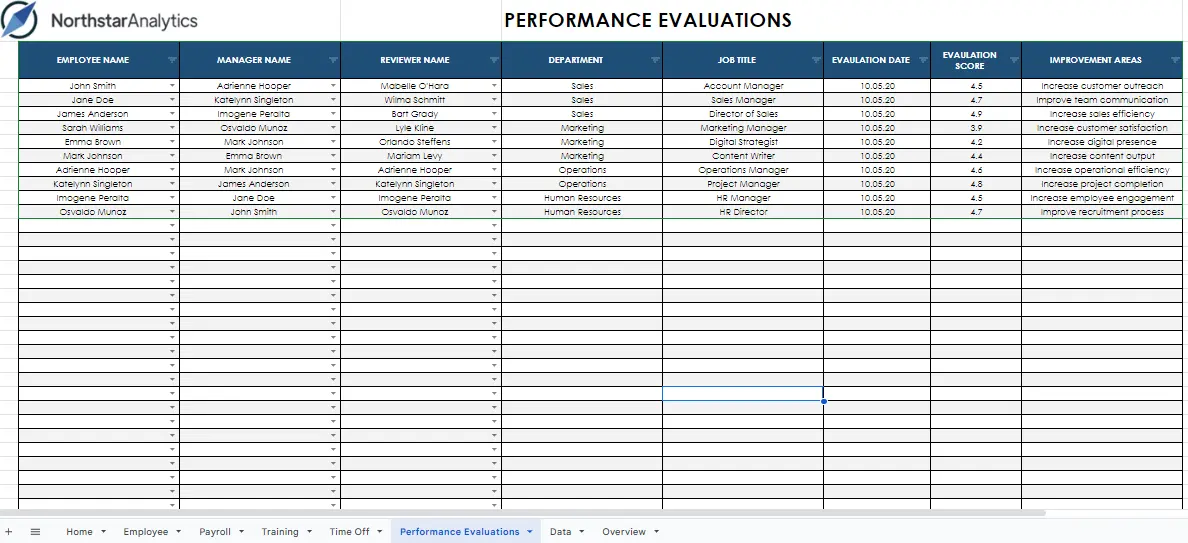
- EMPLOYEE NAME: This column contains the names of employees who are being evaluated. It serves as a reference to identify and associate evaluation records with specific individuals within the organization.
- MANAGER NAME: The MANAGER NAME column captures the names of the managers responsible for supervising and evaluating the employees. It helps establish the reporting relationship and identifies the managers involved in the evaluation process.
- REVIEWER NAME: This column records the names of the individuals or reviewers who are involved in assessing the performance of the employees. They may be colleagues, team members, or individuals from different departments who provide feedback and input for the evaluation process.
- DEPARTMENT: The DEPARTMENT column indicates the department or division to which the employees belong. It helps categorize and group employees based on their functional areas within the organization.
- JOB TITLE: This column specifies the job titles or positions held by the employees being evaluated. It provides information about their roles and responsibilities within the organization.
- EVALUATION DATE: The EVALUATION DATE column represents the date on which the performance evaluation takes place. It helps track the timing of evaluations and provides a chronological record of the evaluation process.
- EVALUATION SCORE: This column captures the scores or ratings assigned to employees based on their performance evaluation. It quantifies the performance levels or achievements of the employees according to the evaluation criteria or metrics.
- IMPROVEMENT AREAS: The IMPROVEMENT AREAS column identifies the specific areas or aspects where employees can improve based on the evaluation results. It highlights opportunities for growth and development, enabling employees to focus on enhancing their skills and performance in targeted areas.
Data Page
The Data sheet serves as a consolidated repository, encompassing employee information, payroll details, training records, time off data, and performance evaluations, requiring updates or additions to be made through the respective sheets.
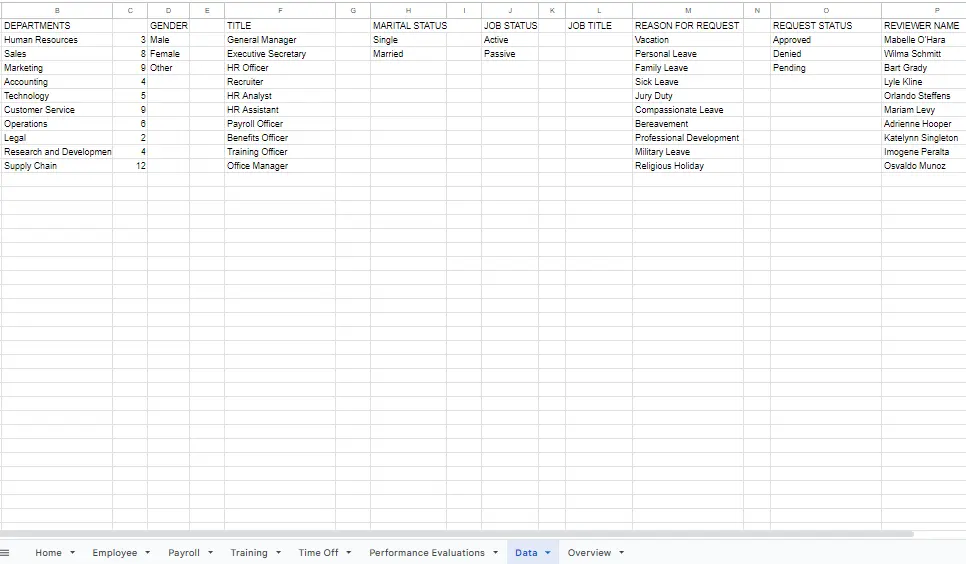
- DEPARTMENTS: The DEPARTMENTS represent the different departments within an organization. It helps categorize and organize employees based on their assigned department or team.
- GENDER: The GENDER indicates the gender of employees. It helps track and analyze gender diversity within the organization.
- TITLE: The TITLE refers to the job titles or positions held by employees. It provides information about the specific roles and responsibilities of individuals within the organization.
- MARITAL STATUS: The MARITAL STATUS records the marital status of employees, such as single, married, divorced, or widowed. It helps track the marital status distribution within the workforce.
- JOB STATUS: The JOB STATUS indicates the employment status of employees, such as Active, or Passive.
- JOB TITLE: The JOB TITLE represents the specific job titles or positions that employees hold within the organization. It provides more detailed information about their roles and responsibilities.
- REASON FOR REQUEST: This provides a brief explanation or description of the reason why the employee is requesting time off. It helps provide context or justification for the requested absence.
- REQUEST-STATUS: The REQUEST-STATUS column indicates the current status of each employee request, such as pending, approved, or denied. It allows for easy monitoring and tracking of request progress.
- REVIEWER NAMEAREAS: This column records the names of the individuals or reviewers who are involved in assessing the performance of the employees. They may be colleagues, team members, or individuals from different departments who provide feedback and input for the evaluation process.
The sheets contain an excessive number of dropdown cells, which offer the same data as related cells without the need for rewriting, thus saving you time. The data in the dropdown lists can be easily deleted, added, or edited directly from the DATA sheets in each file.
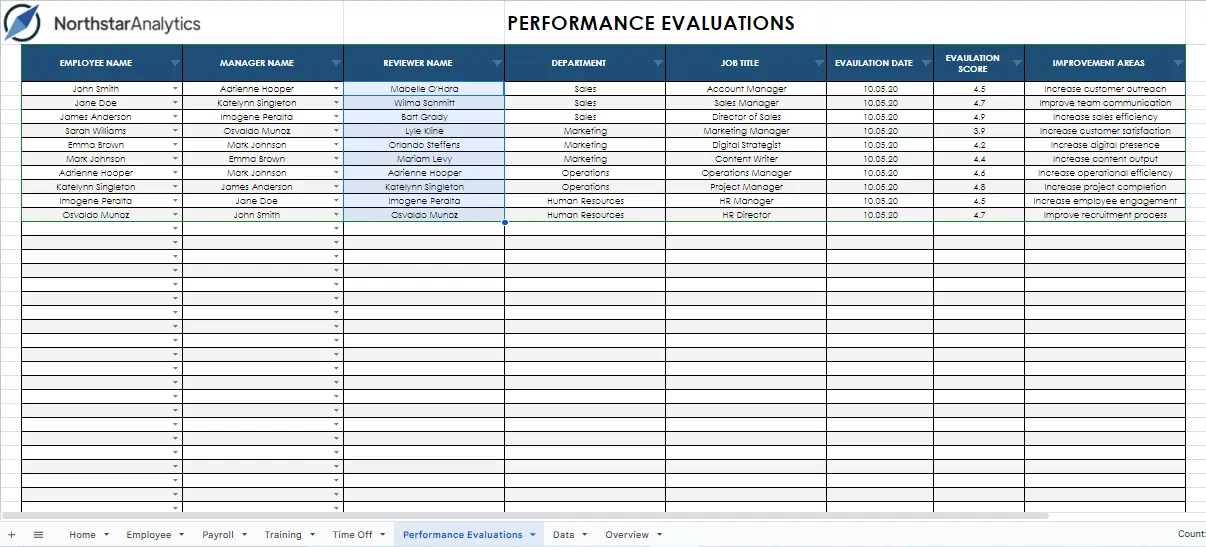
How to create dropdown cells?
Let's assume that you want to add your customer data to the customer table and make it selectable in the customer name column.
Create the REVIEWER NAME header and paste your reviewer data.
Note: If the data includes formatting, you can select "paste values only " from the paste options.
Navigate to the table you want to connect your data to and select the cells you want to connect.
Choose data validation from the data tab.
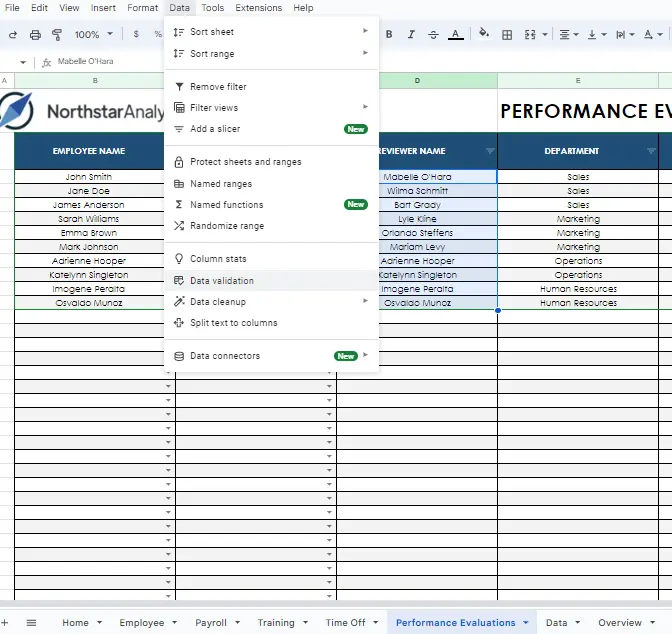
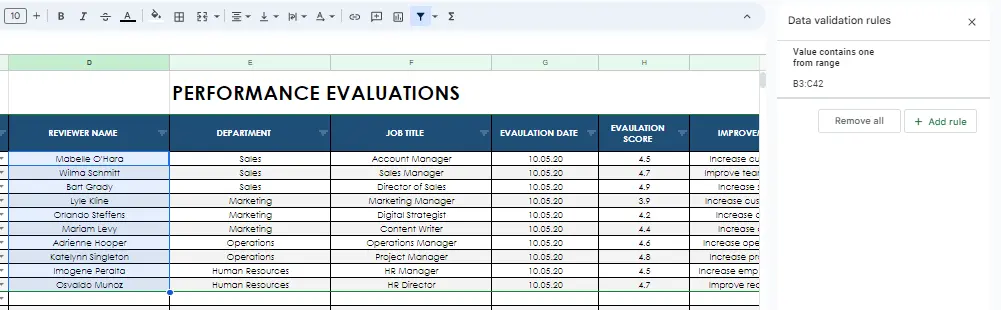
Select "add a rule" from the window that pops up.
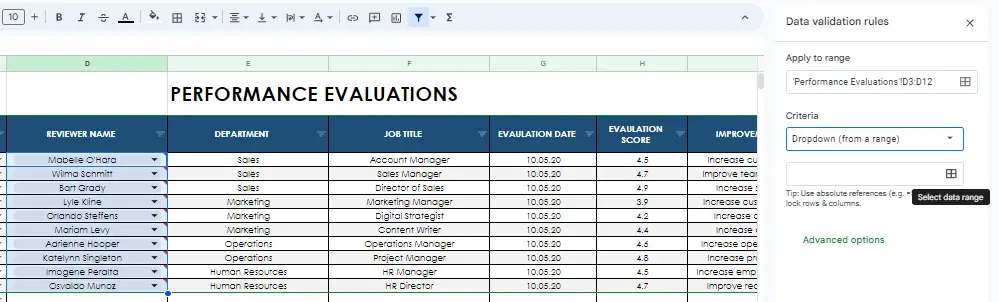
The applied field automatically appears as the field we selected. Under "criteria", select "from a range" from the dropdown menu. Hover over the box and click "Select data range".
Go to the data page and select your source data.
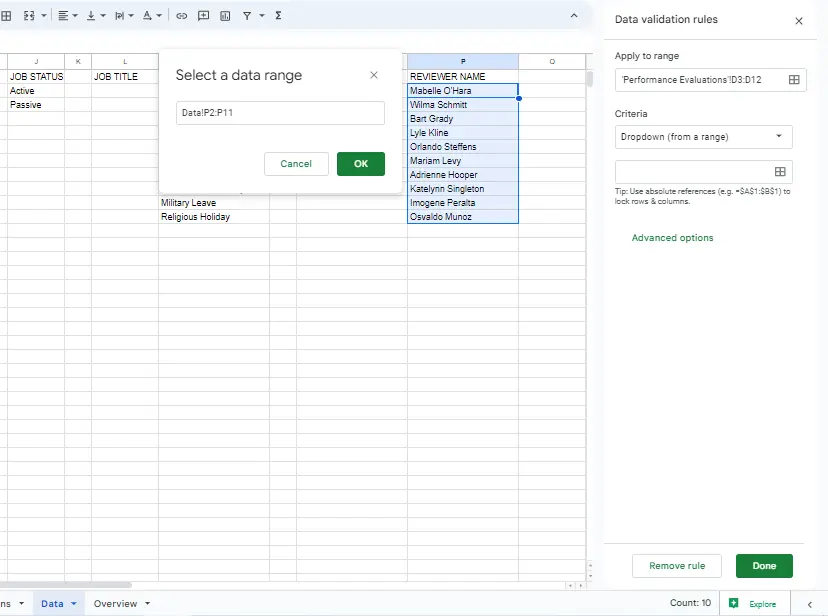
The window that pops up will be automatically filled based on the cells you selected. Then click OK.
Advanced options allow you to make adjustments. I chose to display it as an arrow in the Display Style because I wanted it to look like the others.
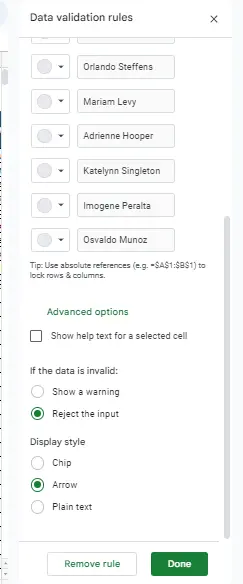
After making the necessary adjustments, click Done. It's ready now.
