Marketing Management System Spreadsheet Template
The world of marketing is ever-changing and competitive. To stay ahead of the curve and maximize profits, businesses need to have the right tools in place to manage their marketing activities.
The Marketing Management Excel Spreadsheet is an easy-to-use tool for businesses to manage their marketing activities. It helps to track customer engagement, analyze marketing campaigns, and create marketing budgets.
With the help of this spreadsheet, businesses can stay organized and efficient. This guide will walk you through the steps of setting up and using the Marketing Management Excel Spreadsheet.
You can watch the YouTube video below if you don't want to read the whole page. Let's start.
Home Sheet
The Home sheet is the main page of the Marketing Management Excel File. It provides an overview of all the other sheets, including the Campaigns, Social Media, Email Marketing, Advertising, and Datasheets.
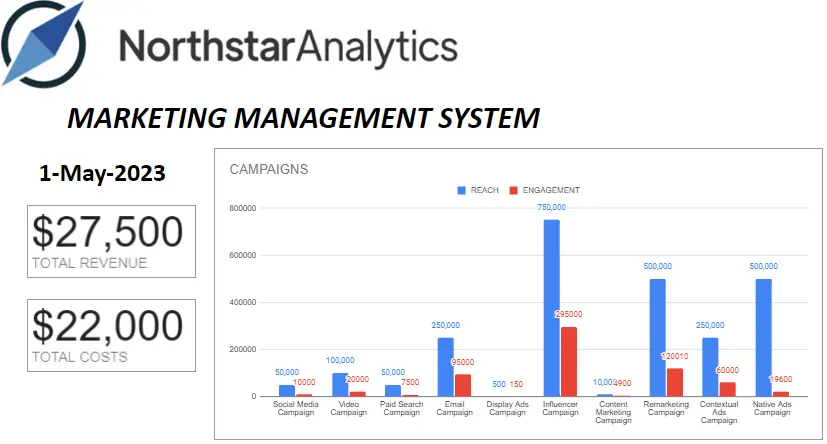
- To get today's date on this page, simply type =TODAY() in the formula bar on the left top side of the page. You can customize the appearance of the cell by merging cells and using formatting tools. To view the formula and formatting options, click on the cell.
- The "TOTAL REVENUE" scorecard chart shows the sum of data from the "TOTAL REVENUE" column in the table located on the Advertising page.
- The "TOTAL COSTS" scorecard chart shows the sum of data from the "TOTAL COSTS" column in the table located on the Advertising page.
- The column chart displays the distribution REACH and ENGAGEMENT of the campaigns. The all data come from Advertising Page.
Campaigns Sheet
The Campaigns sheet allows users to create, manage and track campaigns. This sheet includes all of the necessary information to help users plan and execute campaigns, such as budget, target audience, and objectives.
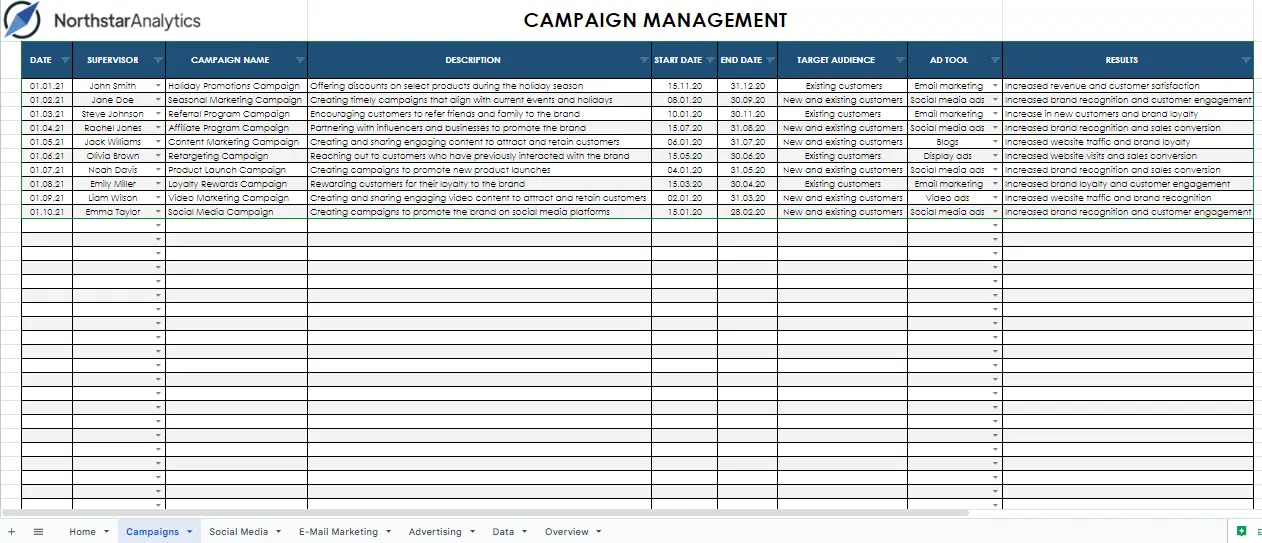
- DATE: The DATE column represents the date when a particular campaign was initiated or recorded. It helps in tracking and organizing campaigns chronologically.
- SUPERVISOR: The SUPERVISOR column identifies the person responsible for overseeing and managing the campaign. It helps assign accountability and ensure effective coordination.
- CAMPAIGN NAME: The CAMPAIGN NAME column contains the unique names or identifiers assigned to each marketing campaign. It helps in distinguishing and referencing different campaigns.
- DESCRIPTION: The DESCRIPTION column provides additional details or information about each campaign. It can include the campaign objectives, strategies, target market, or any other relevant information.
- START DATE: The START DATE column represents the date when a particular campaign officially begins. It helps in scheduling and monitoring the campaign timeline.
- END DATE: The END DATE column specifies the date when a campaign concludes or is scheduled to end. It assists in evaluating the campaign's duration and assessing its success within a specific timeframe.
- TARGET AUDIENCE: The TARGET AUDIENCE column defines the specific group or segment of customers that a campaign aims to reach and engage. It helps in tailoring marketing messages and strategies to a particular audience.
- AD TOOL: The AD TOOL column indicates the advertising or marketing tools and channels used for the campaign. It can include platforms such as social media, email marketing, print media, or any other promotional channels utilized.
- RESULTS: The RESULTS column captures the outcomes or impact of each campaign. It can include metrics such as increased revenue, customer satisfaction ratings, conversion rates, or any other relevant data. It helps in evaluating the effectiveness and success of the campaign.
Social Media Sheet
The Social Media sheet allows users to manage their social media accounts and track performance. This sheet includes analytics for posts, likes, comments, shares, and impressions to help users better understand their social media performance.
The Social Media sheet allows users to manage their social media accounts and track performance. This sheet includes analytics for posts, likes, comments, shares, and impressions to help users better understand their social media performance.
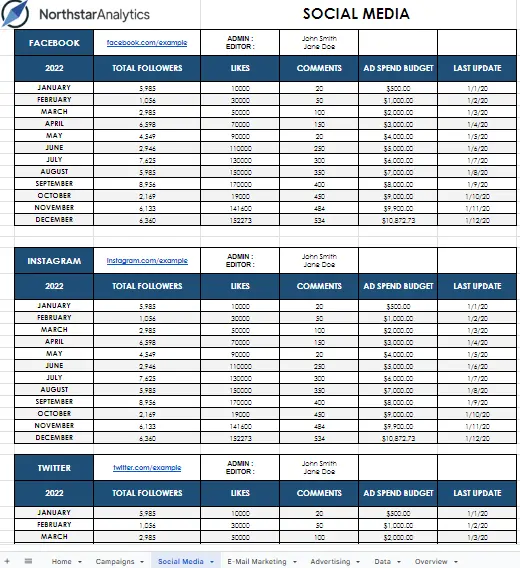
- TOTAL FOLLOWERS: The TOTAL FOLLOWERS column represents the total number of followers or subscribers for each respective social media platform. It indicates the size of the audience reached by the marketing campaigns on platforms such as Facebook, Instagram, and Twitter.
- LIKES: The LIKES column captures the number of likes received on posts or content shared through social media campaigns. It helps gauge the level of engagement and positive response from the audience.
- COMMENTS: The COMMENTS column records the number of comments received on the campaign posts. It represents the level of interaction and engagement generated by the campaigns, providing valuable feedback and insights from the audience.
- AD SPEND BUDGET: The AD SPEND BUDGET column tracks the allocated budget for each social media platform's advertising spend. It helps manage and monitor the financial resources dedicated to promoting the campaigns on Facebook, Instagram, and Twitter.
- LAST UPDATE: The LAST UPDATE column indicates the most recent date or timestamp when the data in the respective row was last updated. It helps keep track of the latest information and ensures the data remains up-to-date.
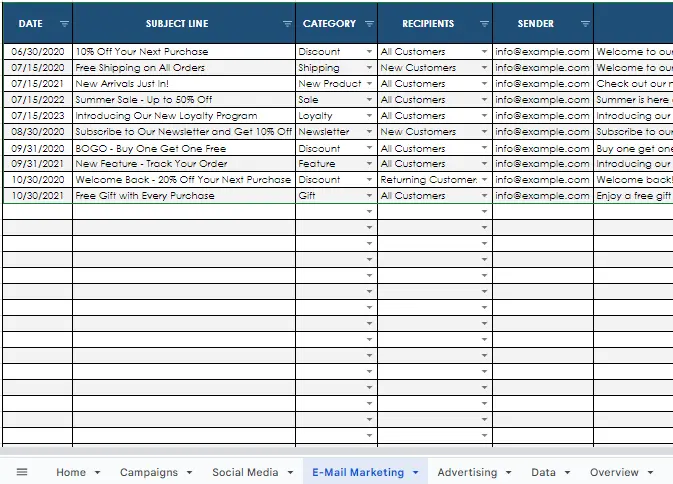
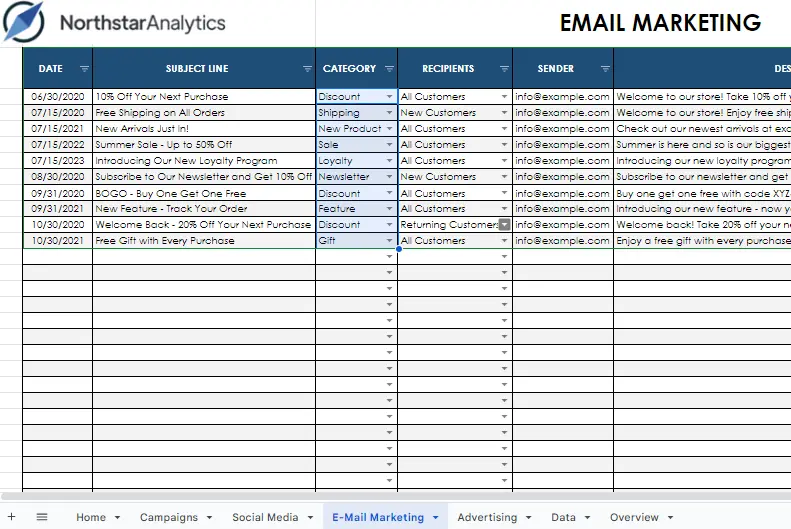
E-Mail Marketing Sheet
The Email Marketing sheet allows users to plan and execute email campaigns. This sheet includes information such as email list segmentation, open rates, and click-through rates.
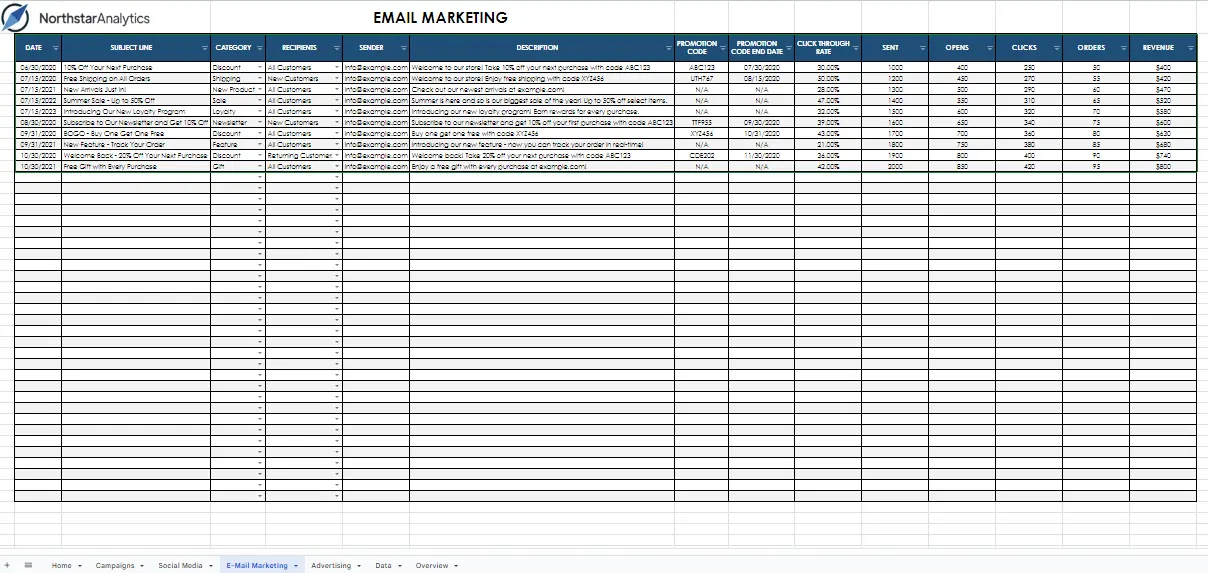
- DATE: The DATE column represents the date on which each email marketing campaign was sent. It helps track the timing and frequency of the campaigns.
- SUBJECT LINE: The SUBJECT LINE column contains the subject line or title of each email campaign. It is the line that appears in recipients' email inboxes and aims to capture their attention and encourage them to open the email.
- CATEGORY: The CATEGORY column specifies the category or classification of each email campaign. It helps group campaigns based on their purpose, target audience, or any other relevant criteria.
- RECIPIENTS: The RECIPIENTS column allows you to select the recipients of each email campaign. It can include options such as "All Customers" or other specific recipient groups. It determines who will receive the email.
- SENDER: The SENDER column includes the email address or sender name of the email campaign. It indicates who the email is being sent from and helps establish trust and recognition with the recipients.
- DESCRIPTION: The DESCRIPTION column provides additional details or information about each email campaign. It can include campaign objectives, content highlights, or any other relevant information.
- PROMOTION CODE: This column represents the promotion code associated with each email campaign. It can be used to track and analyze the effectiveness of promotional offers or discounts provided in the campaign.
- PROMOTION CODE END DATE: The PROMOTION CODE END DATE column specifies the expiration date of the promotion code mentioned in the corresponding email campaign. It helps manage time-limited offers and ensures timely communication to recipients.
- CLICK THROUGH RATE: The CLICK THROUGH RATE column represents the percentage of recipients who clicked on links within the email campaign. It helps measure the engagement and effectiveness of the campaign in driving traffic to the desired destination.
- SENT: The SENT column contains the number of emails sent for each campaign. It represents the total quantity of emails that were delivered to recipients' inboxes.
- OPENS: The OPENS column indicates the number of recipients who opened the email campaign. It helps measure the email's open rate and provides insights into the effectiveness of the subject line and overall email content.
- CLICKS: The CLICKS column represents the number of recipients who clicked on links within the email campaign. It provides valuable data on the engagement level of recipients and the effectiveness of the campaign in driving actions.
- ORDERS: The ORDERS column tracks the number of orders generated as a result of the email campaign. It helps measure the campaign's conversion rate and effectiveness in driving sales or desired actions.
- REVENUE: The REVENUE column represents the total revenue generated from the orders associated with the email campaign. It helps measure the financial impact and return on investment (ROI) of the campaign.
Advertising Sheet
The Advertising sheet allows users to track and manage their advertising campaigns. This sheet includes information such as ad spend, impressions, and clicks, as well as conversion rates.
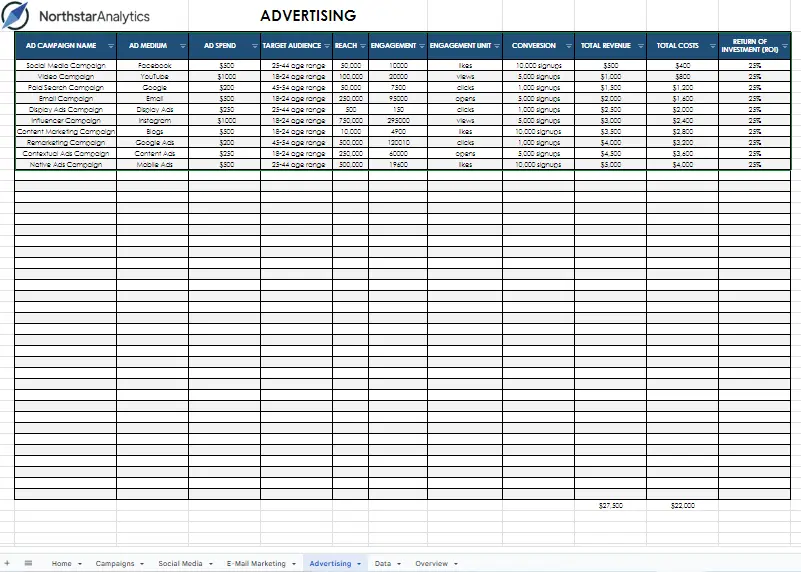
- AD CAMPAIGN NAME: The AD CAMPAIGN NAME column contains the names or identifiers of different advertising campaigns. It helps distinguish and track various marketing initiatives or promotions.
- AD MEDIUM: The AD MEDIUM column specifies the medium or platform used for advertising, such as television, radio, print, online, or social media. It helps identify the channels through which the campaigns are executed.
- AD SPEND: The AD SPEND column represents the amount of money spent on each advertising campaign. It provides insights into the financial investment made in promoting products or services.
- TARGET AUDIENCE: The TARGET AUDIENCE column includes information about the intended audience for each advertising campaign. It can specify demographic characteristics, such as the age range (e.g., 25-44), to ensure effective targeting.
- REACH: The REACH column indicates the total number of people or unique individuals exposed to an advertising campaign. It helps measure the campaign's overall audience reach or potential reach.
- ENGAGEMENT: The ENGAGEMENT column includes numerical values, such as 10,000, representing the level of engagement generated by an ad campaign. It quantifies the level of interaction or response from the target audience.
- ENGAGEMENT UNIT: The ENGAGEMENT UNIT column specifies the unit of measurement for engagement, such as likes, views, clicks, opens, or any other relevant metric. It helps categorize and track the types of engagement.
- CONVERSION: The CONVERSION column tracks the number of conversions achieved as a result of an advertising campaign. It measures the desired actions taken by the audience, such as purchases, sign-ups, or inquiries.
- TOTAL REVENUE: The TOTAL REVENUE column calculates the overall revenue generated by the advertising campaign. It considers the value of conversions or sales resulting from the campaign.
- TOTAL COSTS: The TOTAL COSTS column represents the total expenses incurred for an advertising campaign, including ad spend and any additional costs associated with its execution.
- RETURN OF INVESTMENT (ROI): The RETURN OF INVESTMENT (ROI) column is automatically filled using the formula "=(J6-K6)/K6". It calculates the return on investment percentage by subtracting the total costs from the total revenue and dividing the result by the total costs. It helps assess the profitability and effectiveness of the advertising campaign.
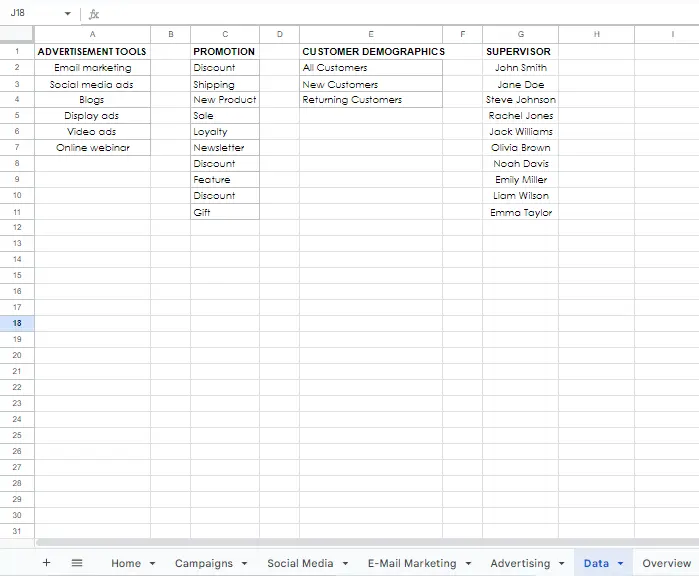
Data Sheet
This sheet contains all the data related to the marketing management system. It allows you to add, view, edit, and delete data as needed.

- ADVERTISEMENT TOOLS: The ADVERTISEMENT TOOLS column contains various tools or methods used for advertising and promotion. It includes options such as Discounts, Shipping, New Products, Sales, Loyalty, Newsletter, Features, Gifts, and others. This column helps track the specific advertising methods employed in the marketing management system.
- PROMOTION: The PROMOTION column represents different promotional activities or strategies implemented as part of the marketing efforts. It includes options such as offering discounts, free shipping, introducing new products, conducting sales, implementing loyalty programs, sending newsletters, featuring specific items, and providing gifts. This column helps monitor and analyze the effectiveness of various promotion initiatives.
- CUSTOMER DEMOGRAPHICS: The CUSTOMER DEMOGRAPHICS column categorizes customers based on different characteristics or factors. It includes segments such as All Customers, New Customers, Returning Customers, and potentially other demographic segments based on age, location, interests, or other relevant parameters. This column helps target specific customer groups for tailored marketing campaigns.
- SUPERVISOR: The SUPERVISOR column records the name or identification of the supervisor or manager responsible for overseeing the marketing management system. It helps identify the person in charge of coordinating and directing marketing activities.
The sheets contain an excessive number of dropdown cells, which offer the same data as related cells without the need for rewriting, thus saving you time. The data in the dropdown lists can be easily deleted, added, or edited directly from the DATA sheets in each file.
How to create dropdown cells?
Let's assume that you want to add your promotion data to the promotion table and make it selectable in the customer name column.
Create the PROMOTION header and paste your reviewer data.
Note: If the data includes formatting, you can select "paste values only " from the paste options.
Navigate to the table you want to connect your data to and select the cells you want to connect.
Choose data validation from the data tab.
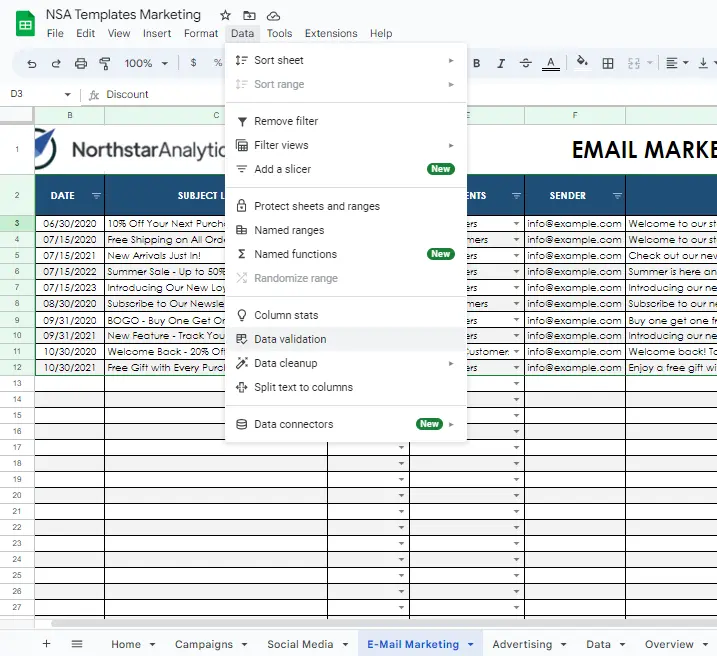
Select "add a rule" from the window that pops up.
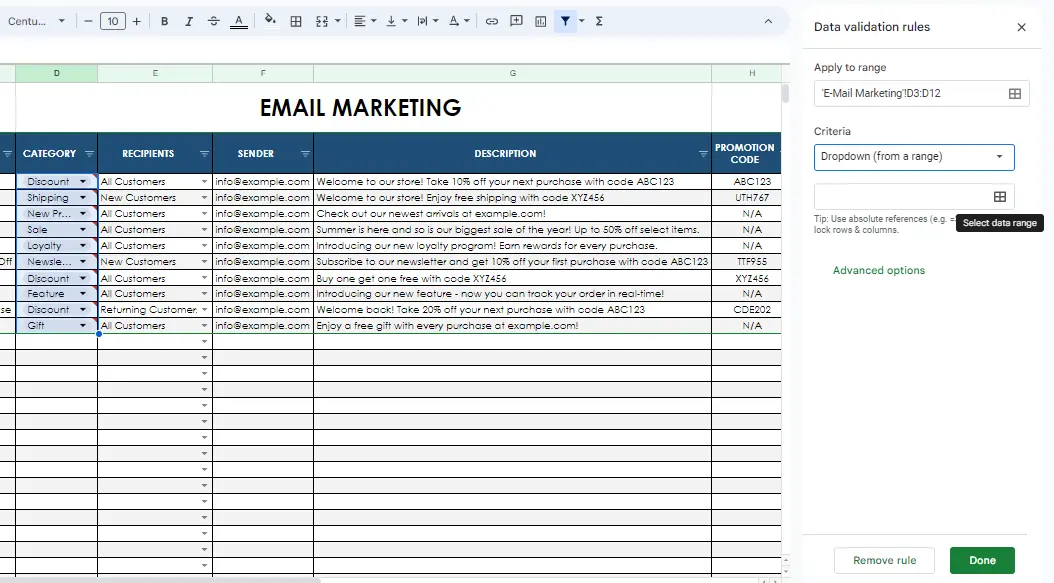
The applied field automatically appears as the field we selected. Under "criteria", select "from a range" from the dropdown menu. Hover over the box and click "Select data range".
Go to the data page and select your source data.
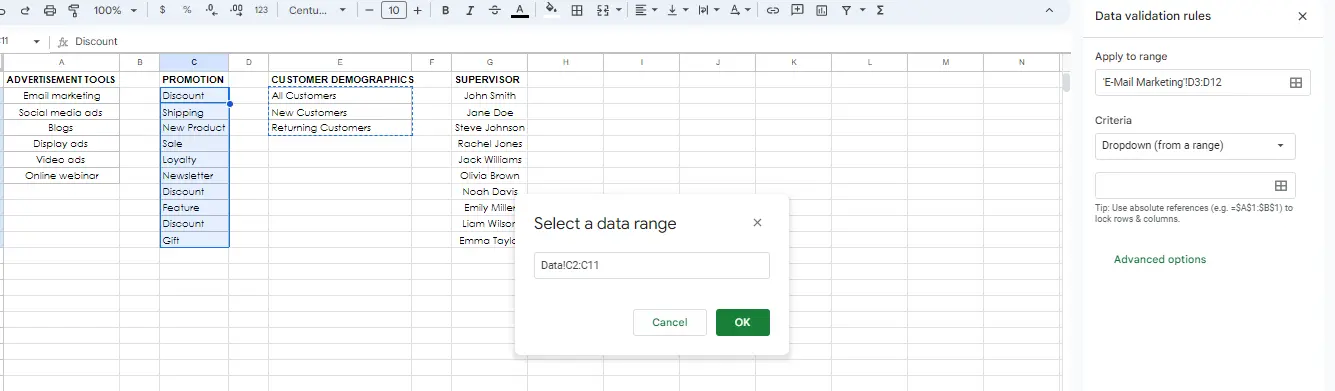
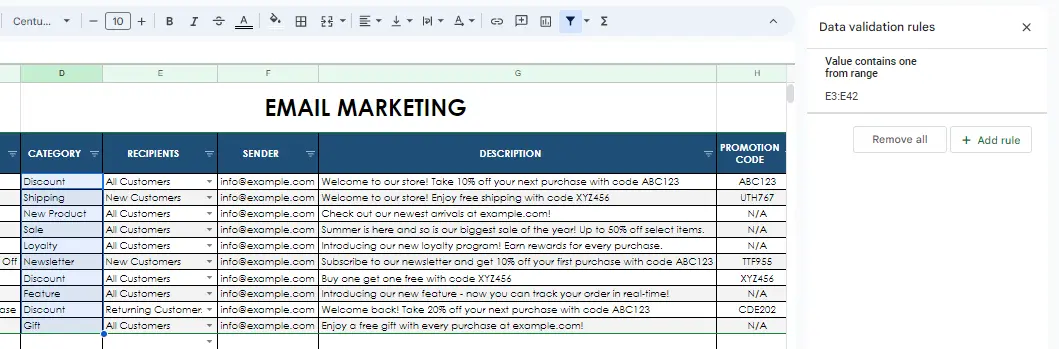
The window that pops up will be automatically filled based on the cells you selected. Then click OK.
Advanced options allow you to make adjustments. I chose to display it as an arrow in the Display Style because I wanted it to look like the others.
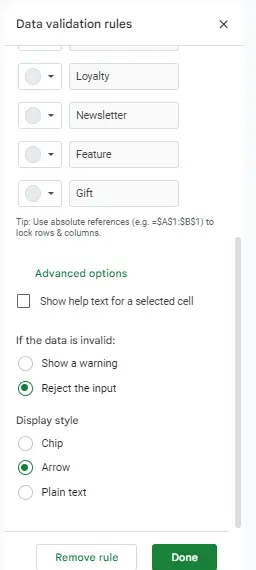
After making the necessary adjustments, click Done. It's ready now.